Customer Tutorial and Information Guide for your Grasten Generator:Use this helpful online guide to not only get acquainted with your new standby generator, but refer back to it often and especially before severe weather is forecasted so that you can help ensure your generator is ready to go when you need it most.
Alarm/Fault Codes
How To Clear An Alarm
Checking and Adding Oil
Manually Testing System
Cellular & WiFi Monitoring
Frequently Asked Questions
Alarms/Fault Codes
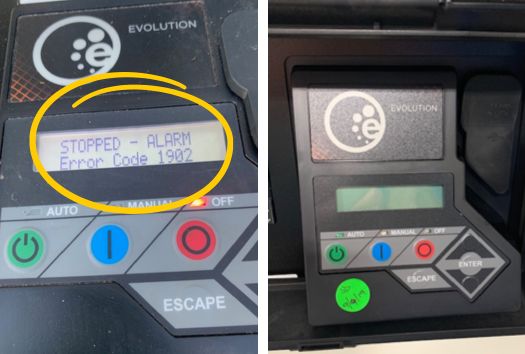
When Alarms/Fault Codes are Present: Your generator will not come on during an outage. These are “latching” alarms that need to be acknowledged and reset manually. The alarm or fault code will be present on the generator control board display.
Common Fault Codes:
-
Overcrank (1100/1101): Unit tried to start 3 times and alarmed to prevent damage to starter.
- Possible cause: Gas line off/vapor locked
- Possible resolution: Ensure gas valves/lines going to the generator are turned on (valve parallel with line).
Overspeed (1200/1206): Unit started and engine revved too high and shut off or tried to start but speed signal was lost to the controller.
- Possible cause: Bad stepper motor on mixer
- Possible resolution: Call Grasten.
Ignition Fault (2600-2602): Unit tries to start and immediately alarms.
- Possible cause: Outdated firmware/bad ignition control module
- Possible resolution: Call Grasten.
Low Oil Pressure (1300): Unit tried to start or started and shut down due to insufficient oil pressure detected.- Possible cause: Low on oil/bad oil pressure switch
- Possible resolution: Check oil dipstick and ensure oil level is at/near full line. Add 5W-30 synthetic oil only if necessary to full line. If the problem persists, call Grasten.
Underspeed (1600-1602): Unit tries to start and it takes a few attempts. Runs rough or shuts down when load is applied.- Possible cause: Bad stepper motor on mixer
- Possible resolution: Call Grasten.
Undervoltage (1900-1906): Unit starts then shuts down after 10 seconds or when load is applied.- Possible cause: Bad voltage regulator/bad rotor or stator/overloaded
- Possible resolution: Call Grasten.
RPM Sense Loss (1500-1521): Unit cranks once then alarms.- Possible cause: Bad mag pickup/bad starter or contactor/bad battery
- Possible resolution: Check battery terminals are tight, free from rust and corrosion, check battery age, call Grasten.
Missing Cam Pulse (2650/2651): Unit cranks once then alarms.- Possible cause: Bad cam sensor/bad controller/bad ICM
- Possible resolution: Call Grasten.
CAN Bus Error (2671/2672): Unit cranks once then alarms.- Possible cause: Bad battery/loose battery connections/bad controller
- Possible resolution: Tighten and clean battery terminals, replace battery, call Grasten.
Low Coolant Level (2720): Unit runs for 10-30 seconds then alarms.- Possible cause: Coolant level in radiator low (below sensor)/bad coolant level sensor
- Possible resolution: Fill radiator to full using only 50/50 Prestone coolant, call Grasten.
Missing Crank Pulse (2660/2661): Unit cranks once then alarms.- Possible cause: Bad crank sensor/bad controller/bad ICM
- Possible resolution: Call Grasten.
Fuse Problem (2400): Appears in control board display.- Possible cause: Blown 7.5A fuse on control board/outdated firmware
- Possible resolution: Replace fuse, call Grasten.
Inspect Battery/Air Filter/Oil Filter/Spark Plugs (Warning): Comes on as a maintenance reminder every 4-6 months.- Possible cause: Maintenance reminder
- Possible resolution: See “How to Clear Alarms/Fault Codes”.
Service Schedule A/Service Schedule B (Warning): Comes on as a maintenance reminder every 4-6 months.- Possible cause: Maintenance reminder
- Possible resolution: See “How to Clear Alarms/Fault Codes”.
Low Battery (Warning): When battery is bad or getting weak or when battery charger is not outputting DC voltage to charge.- Possible cause: Bad battery/bad battery charger in control board
- Possible resolution: Replace battery, call Grasten.
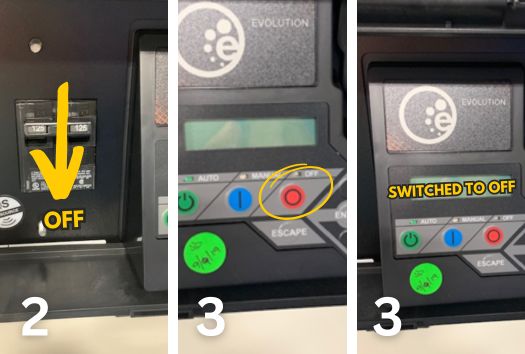
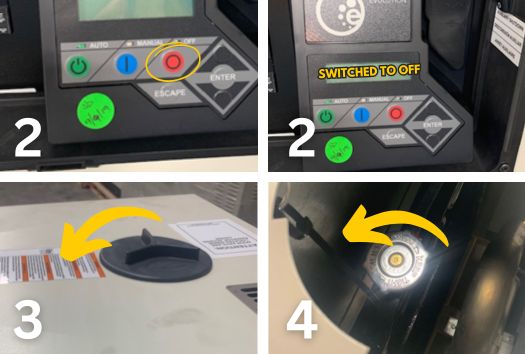
How to Clear an Alarm/Fault Code
- Open access cover on the side of the generator to access the controller.
- Hit the “Off” button on the controller.
- Hit the “Enter” button on the controller (display will read “Switched to Off”).
- Hit the “Manual” button on the controller (unit should start up and run. Let unit run for at least 30 seconds). Note: If the unit has been in alarm for a while, it may take a few attempts to start.
- Hit the “Off” button again.
- Then hit the “Auto” button (display on controller should read “Ready to Run”).
- Close access cover.
![]()
![]()
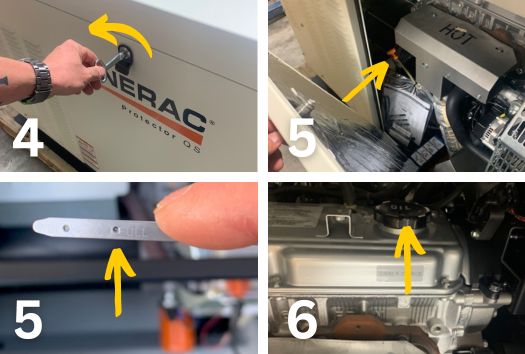
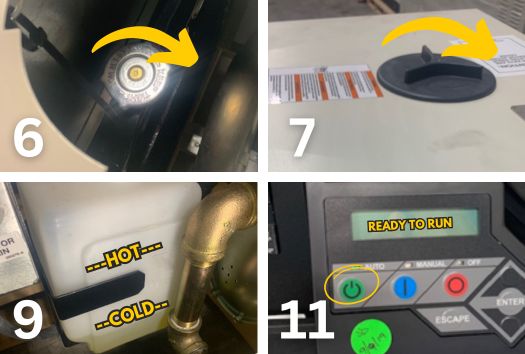
Checking/Adding Oil
- Open access cover on the side of the generator to access the controller.
- Turn main breaker off (like a light switch) located to the left of the controller.
- Hit the “Off” button on the controller (display will read “Switched to Off”).
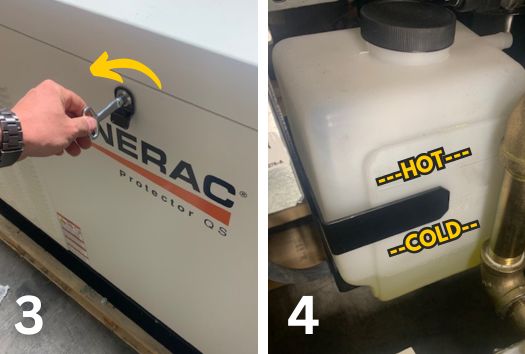
- Use the provided key to open the side panel on the generator enclosure and locate the dipstick (insert key and rotate 90 degrees to the left. The door may stick, so you may need to slightly pry to open).
- Remove dipstick, wipe off, insert and remove again, and check level (should be at/around full hole).
If the level is below full, remove oil fill cap and add oil in small amounts each time checking the dipstick until you have reached the full hole on the dipstick (use 5W-30 synthetic oil). Do not overfill. - Reinstall oil fill cap.
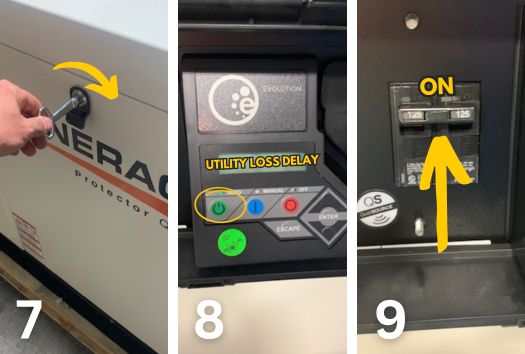
- Reinstall side door by inserting the key and rotating 90 degrees to the right.
- Hit the “Auto” button on the controller (display will read “Utility Loss Delay”).
- Turn main breaker on (like a light switch) located to the left of the controller.
- Close access cover.
Checking/Adding Coolant
Warning: Do not perform if the engine is hot or has recently been running!
- Open access cover on the side of the generator to access the controller.
- Hit the “Off” button on the controller (display will read “Switched to Off”).
- Locate and remove the black access cover on top of the enclosure.
- Locate and remove the radiator cap (push down and turn to the left).
- Ensure coolant is visible and full to the filler neck. If low, fill with 50/50 Prestone coolant only.
- Reinstall radiator cap (be sure cap is secure).
- Reinstall black access cover.
- Open the side door and locate the overflow bottle. Ensure coolant is visible between cold & hot lines. If low, remove the black cap and fill with 50/50 Prestone coolant only. Do not fill more than halfway between cold and hot lines.
- Resecure door.
- On the controller, hit the “Auto” button (display will read “Ready to Run”).
- Close access cover.
Manually Testing System/Equipment
Benefits of Manual Testing
- Ensures generator and transfer switch(s) are working together (transferring to generator power and back to utility power).
- Identifies problems or issues with the equipment early & before an emergency so that repairs are made quickly so that your system is returned to service.
- Manually testing the system will also allow the engine to heat up enough to burn off any condensation that may have accumulated in the oil (prevents milky oil).
- Cures the windings in the stator (electric producer) promoting longer life.
When to Manually Test Your System
- Before a storm: Manually test your system at least a week before a storm is forecasted (run on generator power for at least 5 minutes).
- Monthly: Manually test your system monthly. When you have errands to run is usually the best time to manually test your system (run on generator power for at least one hour).
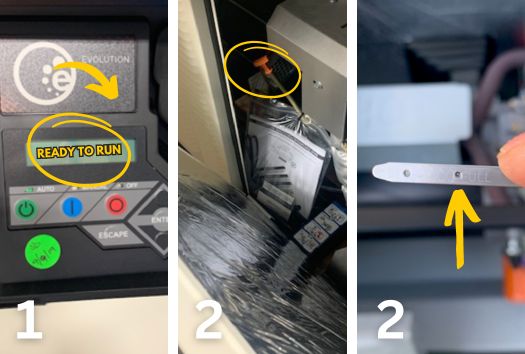
How To Manually Test Your System
- Open access cover on the side of the unit and ensure the controller display reads “Ready to Run”.
- Open side door and locate the oil dipstick. Remove dipstick, wipe off, insert, remove again, and ensure the oil level is at/near the full hole.
- Open the side door and locate the overflow bottle.
- Ensure coolant is visible between cold & hot lines. If low, remove the black cap and fill with 50/50 Prestone coolant only.
- Do not fill more than halfway between cold and hot lines. Resecure door.
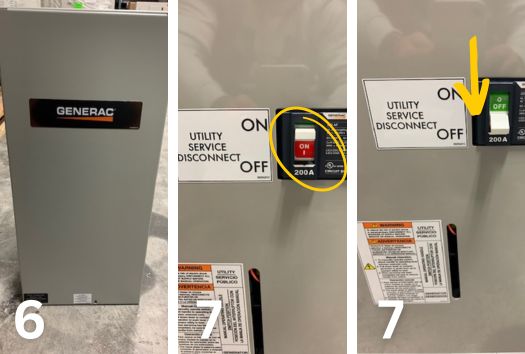
- Locate the transfer switch(s) and remove the front cover (usually located next to the electric meter on the side of the house).
- Turn the breaker labeled “Utility Service Disconnect” off (green off will be visible on top of the breaker). Note: Your generator should start within 5-7 seconds and should transfer to generator power 5 seconds later.
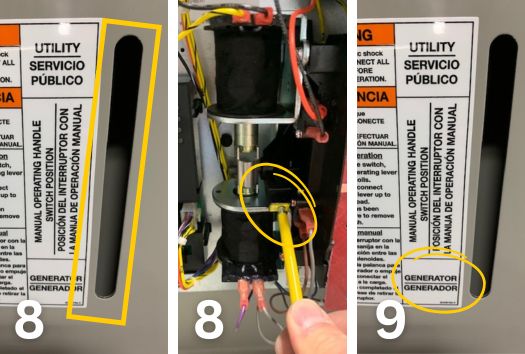
- Through the indicator cutout on the inside panel of the switch, verify the “yellow square with the hole in the middle” is in the down/generator position.
- Reinstall cover and let the unit run for at least 1 hour under load.
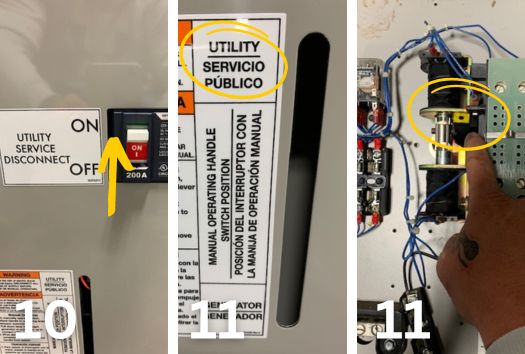
- After an hour of testing, remove the cover on the switch and turn the breaker labeled “Utility Service Disconnect” to the on position (red on will be visible under the breaker).
- After 10 seconds, the switch will transfer back to utility power. Through the position indicator window, verify the “yellow square with the hole in the middle” is fully up in the utility position.
- Verify you still have power in the house.
- After approximately 1-2 minutes of cooling down, your generator will shut off and “Ready to Run” hours of protection will be visible on the display of the controller. If you have questions or there is something wrong with your equipment, call Grasten Generators at 281-259-6500.
Mobile Link 4G Cellular Monitoring
- Can be used with Evolution Series and Nexus Series controllers only
- Has smart phone app for quick status checks
- Real-time reporting of generator activity via email/SMS
- 24/7 monitoring available

MobileFleet WiFi Monitoring
- Can only be used with Generac WiFi capable units
- Has smart phone app for quick status checks
- Real time reporting of generator activity (With Subscription)
- 24/7 monitoring available
- WiFi must be available and connected

Frequently Asked Questions
Why should I have/continue my maintenance plan with Grasten?
Answer: Grasten is one of the top service providers in the state with over 10,000 maintenance customers. Our technicians are factory certified and dedicated to quality and keeping your system operational. Additionally, manufacturers recommend equipment be on a routine maintenance plan through an authorized provider especially while under warranty. Anyone can change oil and filters; however, Grasten Power Technology performs preventative maintenance so we can identify and address issues early at little or no cost so they do not turn into costly repairs later.
How often should my battery be changed?
Answer: Manufacturers recommend batteries be changed every two years. Unlike a regular car battery that gets a workout many times per day, generator batteries sit and charge with a load put on them once per week in most cases, therefore, they are not determined to last as long as batteries used in vehicle applications. Your generator is based around the 12V battery, so having your battery changed every two years will help ensure your generator comes on when the power goes out.
How often should my oil/coolant be changed?
Answer: Manufacturer recommends engine oil change once a year or every 100-200 hours (depending on the type of engine). Coolant in liquid-cooled generators should be flushed every 2-3 years to prevent particle build-up due to coolant breakdown from clogging up the radiator and restricting airflow, causing engine overheating.
What do I do if I lost the key to my generator?
Answer: Call our office and we can mail you a key (see contacts)
Why do my engine motor mounts need to be changed?
Answer: Due to the area we live, humidity and temperatures can cause various components such as rubber motor mounts to wear. Combined with the weight of the engine, motor mounts can dry-rot and compress causing the front of the engine to sag. This shift in the engine can cause the fan to hit the shroud and damage it or cause the front bearing to go out causing damaging vibration when the engine is running. It is less costly to have the mounts replaced at the first sign of wear rather than waiting until costly damage has occurred.
Why is there a Generac Smart Management Module installed on my air conditioner?
Answer: Generac Smart Management Modules are installed as a time delay and automatic load manager in the event your generator gets overloaded and cannot support the current load. When utility power is lost and the generator comes on, there will be a 5-minute delay before the management module will allow power to the air conditioner(s) being managed. Smart Management Modules can also be installed on ovens, dryers, electric heaters, pools, etc.
Why is my air conditioner not working?
Answer: The Smart Management Module (if installed) on the air conditioner in question could be bad. There should be an orange light present in the upper right-hand corner of the module. If there is no light present at all, do not call your AC company! Call Grasten Power Technologies first!